Thursday, October 31, 2013

Happy Halloween!

Yup, you guys just get a quick post of me showing off The Diva. I was going to do another baby shower tutorial, but decided not to. Keeps y'all coming back.

Her outfit she wore to school:


Her witch pumpkin:


And her homemade Cinderella dress (looked better/poofier before trick-or-treating):


Cute, huh? I think so! But, I'm biased, also. Hope everybody had a happy and safe Halloween! 

Wednesday, October 30, 2013

DIY Baby Shower Corsage


Like I said yesterday, today is the ribbon corsage - my favorite piece I made for the shower. Since I already had all of the ribbon (just a matter of going through my boxes to find coordinating colors), I didn't have to spend any money on this project. Yay! 

Materials Needed:
-Ribbon in coordinating colors
-Scissors
-Hot Glue/Gun
-Cardboard Circle (I used one side of a ribbon spool)
-Something to stop fraying ends
-Embellishment
-Safety Pin

Here's a picture of all of my ribbon and my cardboard circle. The smaller pieces of ribbon are 4" and the longer pieces (on the bottom left) are 6". I, actually, did not use all of 
the ribbon I cut, but better safe than sorry. 

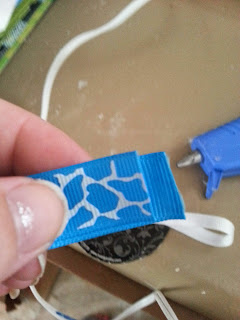
Fold the smaller pieces of ribbon almost all of the way in half, leaving just enough room to put hot glue on both ends. Then, place on your cardboard circle. Sorry, I don't have a pifture of that step, but you can tell what I mean from the next picture.

After you glue down the smaller pieces of ribbon, you get to start on your larger pieces. I used a wood burning tool to cut my ends so they wouldn't fray, but you can carefully use scissors and a lighter. 

Simply glue down your longer pieces of ribbon in the order you want them in.

Lastly, glue down your safety pin.

Oops! And glue on any embellishments.

Personally, I think it's adorable! Down south, we had corsages for just about everything. And I mean big, gaudy corsages! Up here, nada. So weird! 


Tuesday, October 29, 2013

Baby Shower Centerpiece, Safari Theme

Last weekend was my best friend's baby shower, and her sister and I are putting it on for her. Since I like to not spend money wherever possible, I decided to make decorations using items I already had at home or could get really cheap (God bless the Dollar Tree!).
The theme is Safari, which is so adorable to me. I have several other things I'm working on for her baby shower that I'll be showing off over the next couple of days.


Materials needed:
-3 washcloths, 2 green and 1 tan
-6 diapers
-Tape
-Toilet paper roll
-Ribbon
-Scissors
-Rubber band
-Cardboard (optional)
-Monkey or other embellishments (optional)


I was actually able make this centerpiece for $1.07
-I have an obsession for washcloths, so I just took three out of my stash for Little Man (never used)
-I already had the diapers, which we won't miss too much since we'll cloth diaper 95% of the time.
-The monkey was from decorations for The Little Man's wall in our room I'm the new place, but I have 7 others.
-The ribbon I had to buy. With tax at the Dollar Tree I spent $1.07. And I'll use the rest of the spool on other baby shower things (coming the next few days).
I did pretty good money wise, didn't I? I'm so proud of myself!

This centerpiece is pretty self-explanatory, so I'm going to try doing mainly pictures and simple captions.


Cut your roll in half length wise. 
Roll and tape.
Tape together.
Roll in the tan washcloth. 
Place cardboard piece inside of green washcloth (do this 2x's). Then roll (not pictured).
Tape together, creating palm tree.
.
Roll 6 diapers and tape.
Rubber band the diapers together. Stick palm tree in middle diaper.
Tape ribbon to hide the rubber band. Add optional embellishments.
Pretty stinkin' cute, isn't he? He was a big hit, too. Sorry for the crappy pictures. And the trashy looking background. I had to create this guy in the living room, which has terrible lighting. And I had things strewn all over the living room so we could get everything out of the kitchen. Oh, well. I'm sure y'all understand. 

Tomorrow is a ribbon corsage. It was my favorite and, after we get settled in better, I'm going to make custom ones and sell them in my Etsy shop


Monday, October 28, 2013

Moving Mishaps

Spent all day moving boxes and unpacking. My doctor would probably jump my butt if she saw what I was doing. BUT, in my defense, we have to be moved in by the 1st of November, which is this Friday. Not a whole lot of time. And, of course, The Husband would have four graves within a fifty mile radius to do by Tuesday/Wednesday. Not a good week due to moving, but we'll need the money after paying our deposit and getting everything put in our name. Ugh. Moving is a lot of work. Especially when you only had 2 weeks notice. At least we'll finally have a bigger place.

Anyway, we had two mishaps occur during moving stuff downstairs yesterday.

The first is this:


The Husband leaned on the wall by the basement door going outside, and the drywall caved in. Woops! Guess we know what he'll be taking care of ASAP.

And here's the second:


Yes, that IS a snake skin inside of the house. Hanging from the rafters in MY sewing/crafting room! Gross. I just hope the snake is long gone by the time we move in. I hate snakes. Only because they are so quiet and sneak up on you.

Worse part? The Husband hates them more. So, I'm SOL if I find the thing in my stuff and want help getting rid of it. Somebody please pray for us.

With the move, I don't have time to work on anything majorly fun. But, I did just do decorations for a friend's baby shower and will show you how I made them.

Thursday, October 24, 2013

Thief Thursday, Laundry Detergent Pods


Today, I'm going to show you how to make amazing laundry detergent pods! The Diva and I made a batch three weeks ago, and I love it! My laundry smells amazing, I don't have to measure my detergent, I know exactly what chemicals I'm wearing, and it's SO cheap to make!


You can find the original recipe here, but I tweaked it in a way that made a smaller batch than what she had posted.


Ingredients needed:
- 1 1/4 c. Borax
- 1 c. Super Washing Soda
- 3/4 c. Powdered OxyClean
- 1/4 Bar of Laundry Soap
- 1 c. Baking Soda
- 1 1/2 - 2 c. Purex Crystals Fabric Softener

We, also, used the following:
- Ice Tray
- Tablespoon
- Large Bowl
- Small Bowl
- Blender
- Microwave
- Plate
- Whisk


First thing we did was cut the bar of soap into fourths and microwave one of the pieces. Weput it in for 45 seconds, let it cool, tthen another 45 seconds. Above is what our soap looked like when it emerged from the microwave. It felt like Styrofoam. LET IT COOL AND HARDEN! If you don't, the next step won't be as easy or work to well: crumble the soap in a large bowl and add the rest of the ingredients. 


So, this is what it looks like if you don't wait. We didn't at first and so we got big chunks. But, after we let the soap harden, it crumbled nicely. But, since you want it to be as fine as possible, we cheated and put ours in our Ninja Blender. 


Much better, is it not? Perfect powder substance. This is where the original poster stopped, but I wanted the pods so I could just toss the detergent in without measuring, so I went even further. 


In a small bowl, we then added water a teaspoon at a time until we got this consistency. It's not quite wet, but is damp enough to mold it. 


And, we did mold them - into our pods. We put a tablespoon full of our mixture into each cube of the ice tray. Then, we popped them into the freezer for about an hour. You really don't need to put them in the freezer, but I wanted them to take shape quicker so I could take them out of the trays and test them out. 


Beautiful, aren't they? The Diva and I are so proud of ourselves. I use two pods for my large loads, and one for my small loads. When it comes to my medium loads, I determine the number on how dirty my laundry is. The above picture is only one container full of our pods. I have two and a half more already in the cabinet from this one batch.We love these and will continue to make them as long as possible. They work wonders on stains. 


Monday, October 21, 2013

Clean Pillows

Good morning, world! I hope everybody's day is going well. Mine is, but I just woke up. I got a much needed 10 hours of sleep last night. Can't remember the last time that happened. Not to mention that The Husband surprised me with some Yoohoo and I'm eating Lucky Charms. You just can't beat a morning like this, I tell you what.

With packing and moving, I've been trying to ensure everything is clean beforehand so I don't have to clean it while I'm trying to set up the new house. Some things I noticed I've never cleaned that were really disgusting looking? My pillows. I wash my pillowcases at least once a month, but I've never paid attention to the pillows themselves.


8 months of not washing our pillows looks pretty gross doesn't it? I searched online, but only found  instructions that contain bleach, which I really didn't want to do.

This is what I did do, though:
1.) Put two pillows in my washing machine, on their sides, so that it would keep the balance (I have a top loader not a front loader).
2.) Poured in a capfull of our liquid laundry detergent and sprinkled  approximately 1/4 cup of borax on the pillows.
3.) Turned the water temperature to the hottest it would go and turned my washer on.
4.) During the rise cycle, I added a few tablespoons of white vinegar to help sanitize the pillows.
5.) Ran an extra rinse cycle to get rid of the vinegar smell.
6.) Popped my pillows in the dryer (with my wool dryer balls I made here).


Really made a difference, didn't it? It's kind of hard to see just how much of a difference washing them actually made, but I didn't want to edit the picture any. You can tell there's no more yellow or sweat spots, though.  I'm definitely going to start washing my pillows every 4-6 months to try to ensure they never look that gross again.


Saturday, October 19, 2013

Pinterest Link-Up

Does anybody know how to add a Pinterest button to your blog?  I googled it and tried a few different things from my phone with NO luck.  :-(  I plan on trying on my mom's computer whenever I get a chance, but I'm not sure when that will be.

So, I thought I would ask y'all! Anybody know? Anybody have any ideas or suggestions? Because I got nothing.

I would really like to link the two so that I can get more traffic to my blog and pin some of my DIYs to maybe help or inspire others.


Thursday, October 17, 2013

Cheap DIY Closet Doubler AKA Clothes Rod

So, today's post is a very interesting looking contraption that is very handy and actually works quite well. While doing updates to the place we are currently staying at, I decided I wanted to add shelves to our tiny closet to make more room for our things and for the baby's stuff. Four issues:
1.) The amount of clothes we had hanging in our closet made it impossible to add shelves without the clothes being in the way.
2.) I didn't have any way to hang the clothes anywhere else.
3.) I didn't have the money to spend $20 for two closet doublers (one for my side, one for his).
4.) Most closet doublers are too long to effectively still allow enough room for my shelves.

For those of you who don't know what I'm talking about, here's a picture of a closet doubler:


Could come in pretty handy, right? Like I said, I didn't want to spend the money and came up with my own version for real cheap. It looks real funky, but nobody looks in your closet except for you. So, it doesn't really matter, right? That's how I look at it. I seriously thought about taking a before picture, but was  too embarrassed by how cluttered and disorganized my closet was.  

Materials needed:
-Hot glue gun/glue
-Ribbon or yarn or strong string (2 pieces per clothes rod)
-Dowels, rods, or even strong sticks
-Scissors

I already had all of these items, so I didn't have to spend any money.  First thing is to measure how far down you want your clothes rod to be. Then, double that and add 6 inches. Cut your pieces of ribbon to this length.


Put a glob of hot glue on your rod. Then, wrap the middle of your ribbon around the end of the rod three times. Then put a dab more glue on and wrap the ribbon around one more time to help keep it in place.  


Should look something like this when you're done. 


Then, you get to tie it up. I went around my original rod two times before doing a double tie on it. 


And, finally, you get to hang clothes on it! Super simple and super cheap, right? That's why I love it. I got about one week of usage out of it before we started packing. And I didn't even get all of my shelves up! So, no full "After" picture. Grrr.... This is as good as it gets:


Sorry, we were in the middle of packing when I realized I hadn't got a picture. You can see where the other shelves were and how much room my clothes rods gave me! 

I will most likely do a new post at the beginning of the week, depending on how unpacking and setting up goes. Can't wait to share pictures of the new place! 


Wednesday, October 16, 2013

Updates

Sorry I haven't written in a while. Here are a few quick updates on what's been keeping me so busy around here:

I am still in labor and having contractions, but am home and have to go to the doctor's office two times a week. Which, really wouldn't be so bad, except it's an hour away AND I have to be dependent on somebody else to drive me (doctor's orders). But at least he's staying in there and continuing to grow.

On another note, we found a bigger place to rent!  Yay!  Of course, it would be less than a month after I started doing updates to this place to make it more accommodating to our family. Oh well, the next renters will enjoy it, I'm sure. The most exciting thing about the new place? I will get to have.... A REAL CRAFT ROOM!!! Ah! I'm so happy! So, I've been over there all week cleaning everything and get to start moving our things in tomorrow. Here's our key to our new place: (can't wait to nail polish it up)


We also bought a new-to-us truck. The Husband has wanted a diesel for a few years now; but with the new baby on the way, I told him I want a bigger vehicle with lots of room. So, we compromised and got a Dodge Cummins with a megacab. He gets his truck, I get my extra room. Perfect for a family, for his work, and for moving all of our stuff this weekend. Bam! 


Sadly, the picture just doesn't do it justice. But, he's awful proud of it and The Diva is super excited about Daddy's new truck. Like father, like daughter I guess.

My father-in-laws'sbirthday was last Friday, so we had a special cake made for him. He and The Husband are grave diggers, and have some long standing joke about how he's going to die and The Husband will have to put him in the ground. Therefore, The Husband decided to do a cake in honor of that joke. Take a look:


Lovely, isn't it?

Well, that's all I have for today. Tomorrow, I will be doing a new project post. Yay!  About time, isn't it? Hopefully I'll be able to get a new lap top in the next month or so, which will make it 100 times easier to update!