Showing posts with label DIY. Show all posts

Friday, February 14, 2014

Thief Thursday, No Bake Peanut Butter/Chocolate Bars


That is actually quite a mouthful to say. Oh well-it's too delicious to really care. I was in the mood for something chocolate this afternoon, but since my husband is all healthy and what not, we don't have anything already made. So, thanks to Pinterest, I was able to find a quick recipe to make. Here's the link to the original poster.

What's Needed:
-1 cup Graham cracker crumbs
-1 cup peanut butter
-1/2 cup butter
-1 cup powdered sugar
-1 cup milk chocolate chips
--Microwave save bowl
--Spoon or fork
--Glass dish to set them up in

I had to make my own powdered sugar and cracker crumbs. I used the same amount of sugar and blended it for 1 minute to make it into a powder. I made the crumbs in the blender using one package of Graham crackers.

Next, melt your butter and peanut butter together in your bowl (I did 1:11 in our microwave). Stir. Take a taste test, just to make sure it's not poisonous.

If it's not, then continue.
Add in the rest of your dry ingredients (not chocolate chips) and stir some more. Take another test bite, to make sure it isn't terrible.
Still good? Good! Now, press it into the bottom of your pan, melt your chocolate, and pour it on top. I did mine pie style, but that's just for convenience of eating one handed while I hold or feed baby.

Here's my piece:

Oh how I love chocolate and peanut butter combined. So heavenly tasting.

Do you have a favorite recipe? Share it on here and I may just try it and blog about it. I love trying new things!

Wednesday, January 22, 2014

DIY Puppy Treats, Part 1


 How much would your spoiled pooch absolutely love you if you made him/her some delicious, peanut butter puppy treats? Don’t laugh! They are so easy to make and even my picky doggies enjoy eating them! And… just think of the money you’ll save by making your own versus buying them AND you know exactly what your dog is eating. Sounds like good enough reasons to me!

  Materials Needed (makes appx several dozen 1.5” treats - seriously it makes a ton):
- 2 cups whole wheat flour (you can use bleached, but it’s not as healthy and may be harder for dogs to digest)
- 1 cup graham cracker crumbs
- ½ teaspoon cinnamon
- ¾ cup broth (beef for my dogs)
- ¼ cup creamy peanut butter
- 1 egg
- 2 tablespoons canola or vegetable oil


 I put mine in my KitchenAid mixer bowl because 1) it’s easier on me, 2) I’m lazy, 3) I could do other things while it mixed, and 4) something slightly more heavy duty works better for this recipe because it gets pretty thick (but I used my hand held mixer every time I’ve made these treats up until now).
 

 Combine all of your dry ingredients first. Mix well so that the cinnamon is distributed evenly through the crumbs and flour.


 Next, add in all of the other ingredients and mix for 3-4 minutes on Speed 2. Make sure that the dough is in a ball on your mixer and is no longer sticking to the sides.


On a lightly floured surface, roll out dough until ¼ inch thickness.
 

 Cut with cookie cutter.

Place your millions of little treats on an ungreased baking sheet and bake at 300 degrees for 35-40 minutes, or until lightly browned.


Store in an airtight container. Put some in freezer to ensure that they last even longer!


And, if I may note, these dang things smell very appetizing while they are in the oven. Not fair! I, of course silly me, hadn’t eaten almost all day and then had to smell these things for hours while I was cooking them. Although all of the ingredients are edible, I’m just not sure about the whole cinnamon-with-peanut-butter-with-beef-broth-thing would actually taste. Unless you are a dog, in which case they taste scrumptious.

Look forward to a Part 2: DIY Yogurt Topping for Puppy Treats recipe!

If you decide your dog should definitely be allowed to have these healthy and yummy puppy treats, but don’t want to take the time to cook them yourself (Hey, I won’t judge!), they will soon be available for purchase in my Etsy shop: Etsy.com/shop/MommysSewClever


Tuesday, January 14, 2014

Breast Milk Storage System

This post should really go as a Thief Thursday post, but I'm really not sure who originally came up with it and the person I got the idea from doesn't blog. But, I'm just letting everybody know that I didn't come up with this personally, I just love the ease of use and wanted to share.


So, one of the reasons I was so excited to breast feed was because of this breast milk bag storage idea I saw at my sister-in-laws house. Don't get me wrong-there were no doubts in my mind that I would (try to) breastfeed Little Man, but the storage system just gave me an extra reason to look forward to doing it. Besides, it's so simple and - one of my favorite words ever - CHEAP! How could I possibly say no? I couldn't!


Materials needed:
-gift bag the size of your storage bags laying down (use a thick one so it'll last longer!)
-scissors
-tape (just in case)


Cut along the dotted lines on your own gift bag (mine was left over from The Divas birthday party last year). I cut mine and then it ripped a little, so I had to tape the sides. Done. So easy, right?!?! Just pull the bottom bag out through the hole! I spent $0.00 on this project.

It allows you to keep all of your bags in one place, freezes them flat, takes up very little space, and you can put them in order by date so the oldest is used first by being pulled from the bottom. Genius. My SIL had several of these bags full on her deep freeze. I can only hope to grow my stash that big!

(Here's how cheap I am - I rewash and rinse/sanitize the bags when I'm done with them so they can be reused. I put a red dot in the left corner so I know it's on the second time through; after the second time I toss them, though. But... $12 for 25 bags is CRAZAY!)

Thursday, November 21, 2013

Thief Thursday, Peppermint Sugar Scrub


Over the weekend, I decided to make some sugar scrub to go in some pedicure gift boxes I'm making for my Etsy shop. I bought all pink things for my first set, and thought "What better than some peppermint scented sugar scrub to complete the gift?!" So, Isearch recipe on Pinterest and came up on this (and, of course, modified it to fit my liking). 


Ingredients Needed:
 - 1/4 cup Granulated Sugar
- 2 Tbsp Epsom Salt
- 2 Tbsp Olive Oil (Wish I had Coconut Oil instead right now)
- 3-5 drops Peppermint Oil
- Coloring (optional)

You also need:
- Bowl/Spoon for mixing
- Another small bowl and spoon if you color some
- Storage Container (Baby food jar in picture, but I decided on something different later)


Mix the sugar and salt together first in the bowl. Then, add the oils. If you don't want color is yours, you are now done. Pretty simple, right? Imagine what you would have paid for that in a store...

If you decide to color yours, just separate your sugar scrub in half, add a few drops of color to 1/2, and mix. Add more drops, if desired. I made mine more pinkish to match the gift box.

Then, just layer by the spoonful and pack in (so they don't mix later) a container that can the tightly sealed. Sitting out, the scrub is supposed to be good for at least 2 months. I recommend refrigerating yours if you know you aren't going to use it daily or several times a week


Thursday, November 14, 2013

Thief Thursday, Bath Bombs


Well, with no job and no way to personally pay for Christmas presents like I'm used to doing, I decided to turn to Google and Pinterest for homemade ideas. I actually found some really amazing ideas, one of which was homemade soap. I've always wanted to try making my own, but never remember to buy glycerin when I'm at a specialty store. Maybe I'll remember one day. Maybe.

Anyway, it reminded me of what I buy my mother in law every year: a gift box from Lush. If you never heard of them before, click on the link. They're located all over the world and are absolutely amazing! Only problem? The price. Seriously? $4.95 PLUS tax (and shipping if you don't live close - like us) for a bath bomb?! I'm a mom! I do NOT have the money to pay $5 for a fun bath every time I want it or have a stressful day. Solution? Make my own! That way, I can even make smaller ones so I don't feel so wasteful and they last longer.

I found two favorable recipes:
1.) XO Vain
2.) Maria's Self

I wasn't sure which one I liked more, so I combined them both to make my own. I made a very small batch so that I could try it out without risking wasting too much of it if it fails (Chemistry is not my strong suit). Here goes:
Note: my supplies and cost is only for the amount I made, which was very tiny. The more you make the more ingredients you will need to purchase and more money will spend.

In a small bowl, mix together:
-1 Tbsp Epsom salt ( $0.88+ at Walmart)
- 1 Tbsp Citric Acid ($3.97+ at Walmart)
- 1/2 Tbsp Cornstarch ($0.96+ at Walmart)
- 2 Tbsp Baking Soda ($0.54+ at Walmart)
(I will post amounts needed for a larger batch at the end of the post)


In a small container, combine:
- 2 tsp Olive Oil ($3.98+ at Walmart)
- 2-3 Drops Essential Oil (Optional; I paid $5.95 here.)


Slowly drizzle liquid mixture on top dry ingredients. 

Mix together.

In a spray bottle, add some water and a few drops of coloring (optional - I bought mine here). You don't want to use food coloring, as it may stain your tub. I DEFINITELY recommend using small, travel-size spray bottles instead of big ones, but I can't find mine. We didn't use any color in this batch, except for a few drops added to hers later for green, and some in the middle of one of mine. 

Slowly spray/mix in water until you get a chunky consistency that is crumbly, but moldable and still looks dry. We didn't do more than 2 sprays at a time because our mixture began to fizz and we didn't want that to happen too much before we got them into the bath tub! 


Then, stuff mixture into molds (I cut a small ornament in half and we stuffed both sides and put it together, and I filled a heart cookie cutter) and set out on wax paper. Let set forever. Okay, so it's only 24-48 hours, but it feels like forever!

Touch gently to make sure they are dry and hard all the way through. Then, have fun in the tub! We stored ours inside of the plastic bag. They should stay good for a while, but make sure to store them in an airtight container of some sort. 


Here's the recipe for a larger batch:
- 2 cups Epsom Salt
- 2 cups Citric Acid
- 4 cups Baking Soda
- 3/4 cup Cornstarch
- 1/4 cup Olive Oil
- 10-15 drops Essential Oil

Here's a picture of mine in action. Ah... So relaxing!  I cannot wait to make more of these and give them out at Christmas time, along with several other homemade bath products I've made this week! 

P.S.- Here is where I bought my color.


I'm now on Bloglovin'! Make sure to follow me! 

Monday, November 11, 2013

Save Money: Foam Soap

Over the weekend we ran out of our beloved foam hand soap. Usually, I have a spare in the cabinet, but I decided to quit paying the almost $6.00 for one bottle to last a few weeks. Sorry, but I'm too broke for that. Not to mention my skin is too sensitive for other soaps; trust me, I've tried Softsoap, Dove, and so many others. 

Anyway, a super simple way I learned I can still have foaming Bath & Body Works soap without paying a bunch of money every time?  Pay it one time! Well, it's $11.50 a few times a year, but that's still a better price than $5.50 one to two times a month. AND if I were to hit one of the big sales or but out-of-season soaps? My head just exploded with the amount of money I would save! 

Here's the secret:
You need an empty foam soap dispenser and your favorite smelling body wash (or shower gel).

1.) Pour some body soap into the empty container, until it's about 1/5 full. 

2.) Add water to the foam container, until it's about 3/4 full (otherwise, you'll have some spill over the top when you put the lid on). 

3.) Shake up the soap/water mixture until the soap is well dispersed.  

4.)Throw away (or put away, if you didn't use all of it) your bottle of body wash. Aw, I HATE when I use all of my BBW up. 

5.) Display your soap for all to see/use/smell!
The best part is that you can change it up every time you get tired of using the same sent - without paying a fortune! I really want to try buying a milder scent next time and using essential oils for scents. Then, I could really switch it up season! Mmm... peppermint in a couple weeks for Christmas! Also, I'd like to get the trial sizes when they are on sale. Bet those puppies would work like magic!

Wanna know another secret? You can use this for any kind of soap. Not just hand soap. I also use this method in the kitchen for dish soap while washing dishes! Anybody have any tips or tricks they used to help save money when it comes to soap? I'd love to hear them!

Monday, November 4, 2013

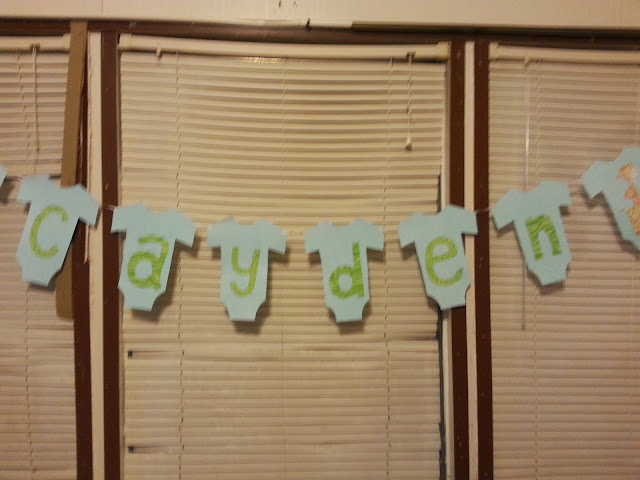
DIY Onesie Name Banner for Baby Shower

The onesie name banner turned out absolutely perfect. It was the most time consuming, but definitely worth it. I just wish I had taken better pictures of it. Learned my lesson there. 

Materials Needed:
- Cardstock
- Pencil
- Scissors
- Scrapbook paper or paper with prints
- Yarn or string 
- Hole punch
-Tape
- Glue/Spray Adhesive 
-Tissue paper - if using white cardstock
- Animals or matching decorations for the plain onesies (optional)
- Copier - optional

I began by making my onesie template, cutting it out, and then tracing it onto my other cardstock papers. I knew I needed 6 for just his name, and I wanted another 6 for the extras on the sides. So... I cheated and made copies instead of drawing the onesie on each paper.  [Hey, at least I'm honest about my laziness! ]


Next, I sprayed a onesie with spray adhesive and I laid a pre-cut piece of blue tissue paper on top of it. I like the wrinkled look, so I didn't even try to get rid of them. However, I can almost guarantee that using glue instead of spray adhesive would work better if you want a smooth look. Or, just use colored cardstock. I had only plain white and saw no reason to spend money on colored kind. 


Trim them up and make them nice and pretty. 

I cheated on these a little bit, too. Scrapbook paper is extremely expensive, and the last thing I wanted to do was use all of my green leopard and zebra for this project. So, I ran a copy of the paper on plain white printer paper. Then, I drew my letters on the paper and was excited to find out I could do two letters per sheet.
Note: I did every other letter the same print. 


Cut and paste your letters. I didn't worry too much about my letters being perfect, since thebanner would be hanging up and nobody was judging it. However, if you're a perfectionist, have fun! 

Punch your holes and put your hanging string through (starting with the plain ones). I recommend putting a piece of tape on the back of each onesie, so that they don't all slide to the middle when you put it up.

Then, you can be done or glue decorations onto the plain onesies like I did to match the theme (copied off onto cardstock and cut out, of course).

Again, sorry for the cruddy photos and backgrounds, but you gotta use what you can when everything's at the new place, right? 

That's the last of my baby shower projects. We'll soon get to start on something new! Just have to choose what...